As I pack my bags to catch an early flight home from Baltimore tomorrow, I want to center myself on jewelry designs to get ready for work when I get home. One plan is to make some knotted necklaces with the resin beads and freshwater pearls.
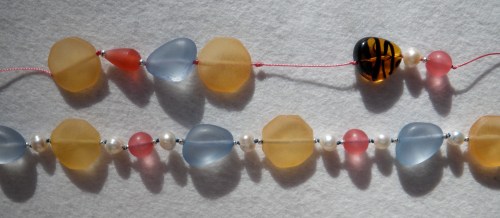
I experimented with some of the new resin beads, to make a necklace to bring to Baltimore, only to find out that I was having trouble with my color combinations. Nothing really appealed to me. (Although I really do like the way the afternoon light is shining through that blue resin!!)
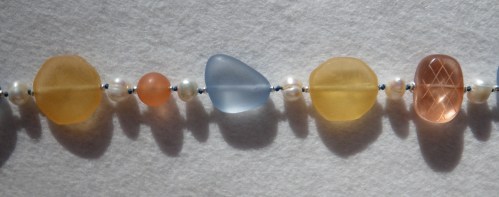
Maybe moving away from the rose color into a more peachy tone would help the combination…
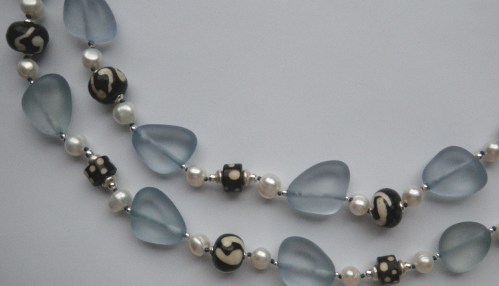
Taking another tact with bone beads of brown and white…
I think that the yellow beads were throwing me off. I’m just not someone who can wear yellow. (I have some ideas percolating for those cool yellow resin babies when I get home. They just won’t be worn by me!)
I made this necklace, wore it this weekend, and will probably be taking it apart when I get home. It’s just not there yet…
Love the bone beads with the pearls, love the blue resin, just not sure I love them all together.
But the one thing that makes all of this stringing and unstringing tolerable and even fun, is having pearls I can use on the heavy nylon stringing cord I prefer for knotted pieces.
“Where can one find pearls with large enough holes” I used to ask? It is a huge pain in the butt to try to use a bead reamer, even if it has a battery, to ream out larger holes pearl by pearl. And, have you ever tried to hold on to one of those suckers to drill a larger hole with a flex shaft drill bit? Good luck.
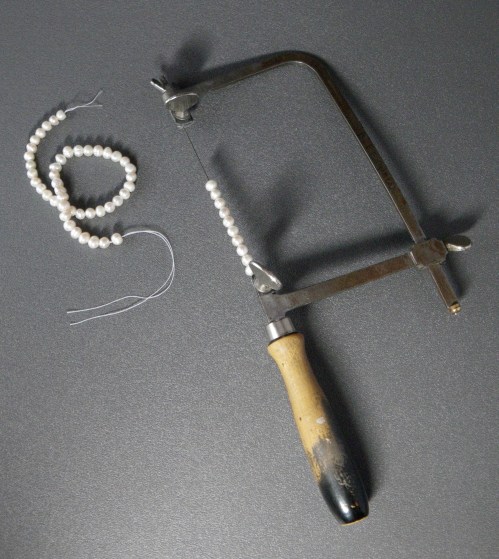
I devised a solution that works well for me, and it helps to hold several pearls in place as I work on them. I line them up on a smaller saw blade (1/0 or 2/0), place it in my jeweler’s saw, and saw in a little circle while holding each pearl. If the pearl slips out of my fingers, it is not going anywhere. I can pick up where I left off and just gently keep working at it. The best part is that it doesn’t require a lot of concentration. It is a “TV job” to work my way through enlarging the holes on a string of pearls. (Meaning I can watch TV while I’m doing it so it hardly feels like work.) It does help to keep a dishtowel or rag in your lap to collect the pearl dust.
This really works for me and I’m glad to share it. Whether making larger holes for stringing or for adding the pearls to 20 gauge wire as earring components, you might want to try it yourself.
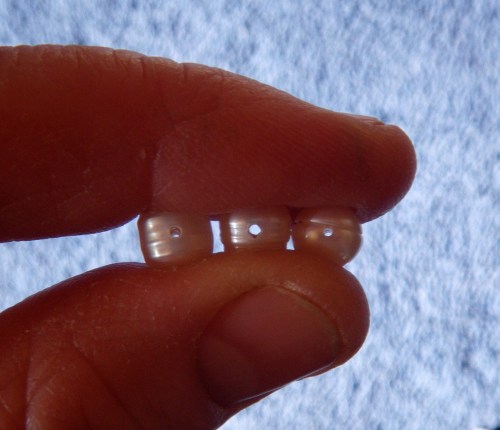
(Yes, it’s the middle one I’ll be able to use in a knotted necklace with #5 Stringth from Rio Grande.)


love the instructions…you’re the best! my problem is that i like to use 1.5mm pearls….no blade i know of fits in there!
LikeLike
Um, you might be screwed for this tip! But, have you tried a 4/0 blade? do they make a smaller one?
LikeLike
The smallest blade I have found is a 6/0 which is .007mm thick….is the 1/0 blade small enough to fit inside a normally drilled pearl?
LikeLike
Wow, the 6/0 is tiny. I don’t usually use that one. A 1/0 is small enough to fit in most holes. Some pearls are just too tiny. (Then I might try that 6/0!)
LikeLike
You are a genius! You just helped me solve huge design issues very easily! Thanks!
LikeLike
That is cool! So glad I could help! Enlarging those pearl holes with a saw is on of my “TV” jobs. In that I can do it at night while I’m watching TV so it doesn’t feel like it’s taking up studio time.
LikeLike
Oh. Duh. I haven’t read that post in a while, so I didn’t realize I already mentioned the TV thing. Pardon my redundancy!
LikeLike
By chance found this tip and just tried it out. Fantastic it works a treat and have just saved myself £18 for a reamer. Thanks
LikeLike
Great. I’m glad it works for you too!
LikeLike
Thank you for the tip! Does this also work with stones? I have a similar problem with a strand of iolite beads, but when I use a hand reamer they shatter….
LikeLike
No, it won’t work for stones. Pearls are a lot softer. You would nee3d a diamond drill bit for making or enlarging holes in the stones.
LikeLike
I wonder if the spiral blades sold for wax carving would work well. I’ve used them to cut pieces out tagua nut slices very successfully. The straight blades go all the way to 8/0 which are almost as fine as a hair and may work for the 1.5mm beads.
LikeLike
Wow. Thanks Tina. I’ve never tried one of the spiral blades. They might work even better! I didn’t realize they came in such a small size. I’m going to try it!
LikeLike
By the way, brilliant idea for reaming beads, sheer genius!
LikeLike
Thanks Tina. I ordered some spiral saw blades to try. Rio Grande’s were too big, so I found some from another source that had them in a 2/0 size. I’ll let you know how they work out!
LikeLike
Thank you so much for this – great idea!
LikeLike
Great idea for reaming beads. The only caution I have is that pearl dust can be toxic so you should do this under running water. The same for drilling any shells. Not a good idea to breathe that dust!
LikeLike
Good suggestion Linda! Thanks. I keep a wet towel in my lap to catch the dust, and I am usually holding the saw down low over the cloth.
It’s always a good reminder to be careful what you are breathing. It would probably be good to wear a mask while doing this.
LikeLike
I have just knotted my first string of pearls. I cannot finish it off at the clasp section where I need to go back into the last pearl. Very grateful that I came across your post. Will be trying the Jewellers saw option as I believe this will solve my problem with the two end pearls. Thanks very much.
LikeLike
Great Nicole! I hope it helps. I put a damp towel in my lap to catch the pearl dust because it’s not good to breathe it in.
LikeLike
Thank you So much i’ve been looking for an easy way to make the pearl holes larger
LikeLike
Hope it works for you!
LikeLike
Pingback: An old dog learns a new trick… | Barbara S Fernald Jewelry
Pingback: An old dog learns a new trick… | Barbara S Fernald Jewelry
Fab – thank you for sharing this tip – I was working on some fresh water pearls last night with a vice and dremel and lots of dust and burning pearls !!
Lynn, London
LikeLike
Save those fingers and lungs! be careful not to breathe in the pearl dust. It can be harmful. I also wrote an update for drilling pearls under water.
LikeLike
Pearls are sold by weight so the better the quality, the smaller the drill hole. There is no need to enlarge the drill hole. To begin the necklace start on one strand of thread and make a double slip knot. Knot all the other knots with a double strand of silk. To finish your necklace, separate the silk strands and knot last three or four pearls after looping the clasp with double half hitch knots. Dab a pin head of water based glue on the thread where you cut the silk. Super glue can harden and crack breaking the silk. Super glue an also run along the thread and block the drill hole making a restring very difficult. Silk thread also is more supple than synthetic and falls better on the neck. No kinks. I have been doing necklaces professionally for more than 60 years. Hope this helps. Don’ forget safety glasses when you do drill the pearls. Wholesale companies drill by laser these days.
LikeLike
If you use a dremel, dip the tip of your drill bit in a drop of cold water from time to time to avoid burning your pearl.
LikeLike
thanks so much for this tip! I just found it and it is going to save me so much time – I’ve been putting off using my small stash of pearls because of the need to enlarge the pearl holes for too long – I was finally going to take the time to drill them out and now I don’t have too!
LikeLike
Glad it will help! (Just don’t breathe in the dust…)
LikeLike
Thanks for the tip! I can’t wait to try it!
LikeLike
Just came across this. Awesome tip and thanks so much for sharing.
LikeLike
Cool! I hope it helps!
LikeLike
SO, to make sure I understand, you are threading the pearls onto a fine wiresaw wire, and attaching it back to the saw, and then twirling the pearl on the line to make the hole bigger?
Sorry, but it isn’t clear to me.
LikeLike
Hi Kristina,
Yes, that is how I am doing it. You want to have the saw blade tight when you attach it back in the saw and screw the holding mechanism in place. I then hold each pearl and saw around the hole, taking a slight amount of material off from the edge of the hole. I try to keep the hole as round as possible, but sometimes my cuts are a little wonky. You also want to make sure not to breath in any of the dust from the pearls as you saw. By stringing the pearls on the saw blade and reattaching it to the saw frame, I am able to hold them more easily when I am sawing.
I hope that makes it a little more clear.
LikeLike
I really appreciate your elaboration. May I ask, are you able to rotate the pearl and make a consistent raking around the inner hole, or must you saw up and down while rotating?
LikeLike
You have to saw up and down a little while you are rotating the pearl because the saw blade only cuts on the downward stroke. It’s a much shorter stroke than if you were sawing through sheet metal, though.
LikeLike
Pingback: A Setting A Day – Day 3 – Sweet & Simple – Pearls on Wires – Step by Step | La Vidalerie
I was going to drill the existing holes of some pearls to enlarge them, but my Flexshaft isn’t working tonight (I haven’t used it in quite some time). I was disappointed that I was going to have to wait until morning to buy a small Dremel to continue my project, but I found your blog and decided I’d soldier on with my saw and some blades. Perfection! I was able to string my entire necklace tonight. Thank you so much for posting this amazing tip.
LikeLike
I’m so glad this idea helped!
LikeLike
I have always heard that when reaming pearls one should hold them under water ad the dust can be harmful to the lungs.
LikeLike
Having just read all the comments, I see that you have addressed the dust issue. I just had an additional thought: have you considered also wearing a face mask while doing this? The ones like my hubby wears while cutting the grass.
LikeLike
A face mask would be a good idea. I haven’t worn one because I felt that the dust was falling into the damp towel in my lap and not going into the air. I was using the saw slowly, so it didn’t seem to make any airborne dust, but there must have been some there. Wearing a face mask would be the safer option. (Do as I say, not as I do!)
LikeLike
Barb have you tried the spiral blades? And for regularly drilled pearls what size blade should I start with? I have drilled hundreds of pearls with my dremel but it was a great deal of work. I want to try your method. What size blades should I start with to fit in those tiny pearl holes? and do you gradually increase the size of the blades until you get to the size you want?What size assortment should I order? Advice welcomed! Please respond to me via fb if you can, thank you!
LikeLike
Just sent you a FB friend request so I can respond. I guess I could respond on my FB business page. I’m still learning how to use that. I’ll also respond here in case someone is following who does not use FB.
Yes, I have used spiral blades and I think they are faster. I don’t think I got them from Rio Grande. I use a 2/0 saw blade, usually since that is what I have on hand. If the pearl hole is too small to fit that then I consider different pearls! The twist blades are sixe 2/0 as well. The date on the package is: 3/19/2012 So, no wonder I don’t remember exactly where I got them. I’m guessing they came from Amazon because I just found the exact same item there: http://www.amazon.com/CUTTING-CARVING-PLASTIC-1-GROSS-NOVELTOOLS/dp/B012BLTD1M/ref=sr_1_7?ie=UTF8&qid=1445734672&sr=8-7&keywords=jeweler+spiral+saw+blade. At $26+ they seem a bit pricey, but I’m o0nly using them on the pearls and they will last me years. Hope this helps. xo Barb
LikeLike
TOXIC WARNING….and CAN kill you. Take every measure to ensure air circulation…and WEAR A MASK! If you are watching TV you are distributing the dust into your house….now EVERYONE is at risk. PLEASE head these words…
LikeLike
Yes, Jennifer, wearing a mask is prudent in many situations. This would be one of them. I mentioned that in response to one of the other comments. As for putting everyone one else at risk in my house, I don’t ream pearl holes while watching TV on a regular basis. Most of the dust falls into the damp towel in my lap. I don’t believe I am putting my husband at risk as he is not near me when I am doing it. If I had small children or pets at home, I would reconsider where I do this occasional work. Thanks for your concern!
LikeLike
Wow!! Thanks so much for sharing that little tidbit! I’ve struggled with those bead reamers (and broken a few, too!). This will definitely help!
LikeLike
I still grab those bead reamers and they never seem to quite do the trick. Thanks for the comment!
LikeLike
Thank you very much for your very brilliant idea! Is it also applicable for small barrel corals?
LikeLike
Glad it helps. It’s recommended to wear a mask when drilling organic material. I’ve never tried it with coral, but would imagine that it would, given the softness of coral. Good luck!
LikeLike
Great idea. You should also know that when working with pearls, bone, etc., it is advisable to make sure you wear a mask, as the dust from these items can be harmful to your lungs and sinuses. It is also advised to use water when doing these types of projects, to keep the dust down! I suppose a bucket of water to dip your saw frame into would work, but beware, as if the saw frame and saw aren’t dried well after use in water, you could end up with RUST…a jewelers nightmare!
LikeLike
Genius!!!!
LikeLike
Great suggestion. I have problems with bead reamers as well. I also use a jewellers saw and so I can use it for more jobs. Thanks very much. Candice
LikeLike