Last year, toward the end of the summer, my sister-in-law, Vicky, asked if I would show her some basic techniques of soldering and fusing silver. “Sure, maybe in the fall when we both have more time,” I said. Learning to solder or fuse involves putting two ends of metal together and joining them solidly with the heat of a torch. Although Vicky is very proficient with metal clay and beading, she lacked some tools that would be fundamental to metal smithing. “Just order what you think I’ll need. I have one of those butane torches, but that’s about it,” she told me. Last September I ordered a set of needle nose pliers, a set of needle files, a chasing hammer, a steel bench block, a bench pin, a jeweler’s saw, some saw blades, and some silver sheet and wire. Then our lives stayed too busy to follow through with our plan, until today.
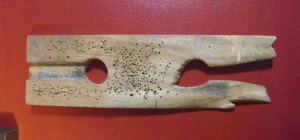
I admit that any teaching situation makes me nervous, even when I’m with people I like to see, but I do like the planning part, and thinking about why I would teach one technique before another. As we got going I forgot about my nerves. I had Vicky get a feel for the saw by cutting into some 22 ga. copper sheet. The sheet is supported by a thin block of wood, called a bench pin, that is clamped to the work bench creating room to move the metal around while keeping the saw in one spot. She traced two ovals on the copper sheet and cut them out. I love hearing the change in sound when someone starts to get more comfortable with the saw. Vicky got there very quickly. She filed the edges of the ovals to smooth them and them drilled holes near the tops. Lastly, she hammered the pieces with the small end of the chasing hammer to texture them. Ta da! Two dangles for a pair of earrings.
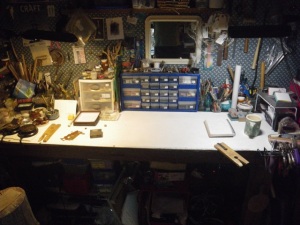
(Okay, right here is where I am kicking myself for not taking ANY photos all day. I apologize. The evening pictures of my workbench and tools are a pitiful compensation for showing you Vicky’s work.)
On to the silver sheet. Vicky cut out two triangles for the top part of her earrings. She drilled holes in the middle of the long sides, with plans to solder posts on the backs. She designed the earrings to connect the copper and silver parts with a jump ring. Then I had Vicky wrap 16 ga. Argentium sterling wire around a round mandrel to make a coil. She cut down through the coil with the saw which makes clean edges on each side of the open ring. (You need a tight clean fit between the pieces when you are soldering or fusing metal.) She also made some square rings.
Ready for the torch! To get comfortable with the torch Vicky started balling up the ends of wire with the flame. This is a basic technique I use all the time to make my own head pins for earrings. Vicky closed the ends on her square links by fusing them with the torch. No solder is required, but a tight join is needed if you want those two ends to flow together. She connected the squares links with the smaller round links between and soon had the makings of a cool little bracelet. Vicky was ready to try the solder. In no time, the posts were on the back of her earrings, the two pieces of each earring were linked with a fused 20 ga. jump ring, and my sister-in-law was comfortable with the torch. She even pulled out a broken ring that she brought along hoping to repair, and soldered it back together!
For me, it has been an “off” summer, creatively. I haven’t spent much time in the studio and I have had a hard time wanting to. Vicky, too, said she hadn’t been making anything for a very long time. Before today, each work space on my bench was a messy pile and I just didn’t feel focused when I walked into my favorite room. It’s a small space (8 x10) and I needed to clean it up to make it workable for 2 people today. I felt focused for the first time in a while as I wrote a little outline for myself to think through the progression of what I would teach Vicky. Her enthusiasm for learning something new and her success with mastering several new tools filled my studio with fresh positive energy. She left wearing a new bracelet, a new pair of earrings, a broken ring repaired, and carrying a box of new tools that she’d learned how to use. I was left with huge satisfaction at her success, optimism for the return of my own creativity, and a clean studio!
I think this day, in the midst of a crazy busy August, was exactly what each of us needed.


Mom, you are a teacher at heart and I hope you are finally starting to acknowledge your teaching potential, I hope you will exercise this gift with every opportunity that presents it’s self.
LikeLike
I love you Cameron Fritz.
LikeLike
Barb,
The creativity that goes into teaching is a lot less tangible and amorphous than the magic you produce with your jewelry–but certainly no less rewarding. The combination of interacting with another person’s memory and attention capacities, communicating (both verbally and nonverbally) and thinking through your own knowledge and expertise to present a new skill sequentially and logically (and in the case of your subject, spatially and motorically as well) is nothing short of brilliant when it is as successful as this post suggests. This is talent. And you’ve got it! I could not agree with Fritz more. The knowledge and skills this lesson entails can be taught, but the talent part is about passion, love and connection. THAT is what makes a GREAT teacher.
LikeLike
Thanks sweet Donna. No one knows teachers like you do! Hmmmmm….still doesn’t mean I’m out hunting for teaching opportunities yet!
LikeLike
What a thoughtful post. It is true that by teaching you teach yourself. I don’t teach often but when I do I feel like you, I get energized to work again.
LikeLike
THanks Helga. It is nice to feel energized right before I go to Haystack this weekend!
LikeLike