(Yes, I’m still hopping to read all of the bead soup blogs. I have about 50 to go. If you’re still hopping too and are looking for my post about bead soup, click here.)

Way back in February, Celie Fago introduced a new alloy of sterling PMC. (Click link to read her blog post about it.) One reason I had never jumped on the PMC sterling bandwagon is that I really don’t like the mess of firing in carbon. (Sterling silver, by definition, is an alloy of 92.5% fine silver and 7.5% copper or germanium in the case of Argentium™ sterling silver.) PMC sterling has just enough copper in it to require the carbon firing that one must use with other base metal clays like copper and bronze. I use carbon firing for those because I have to, not because I like it. When it comes to precious metal clay, my favorite version is PMC+, which is 99% fine silver. It can be fired on an open shelf, which means I can fire many more pieces at one time. The only drawback to fine silver is that it is soft. It can be work hardened, but it still won’t have the strength of sterling silver. For some components I make, it would be great to have the strength of sterling with the ease of firing without carbon.
When Tim McCreight wondered what would happen if PMC sterling were enriched with more fine silver, Celie decided to give it a try. The result was an enriched sterling clay that could be fired on an open shelf. Look Ma, no charcoal! Thank you Celie! The new sterling clay is creating quite a buzz in the metal clay community and I knew I wanted to give it a try too.
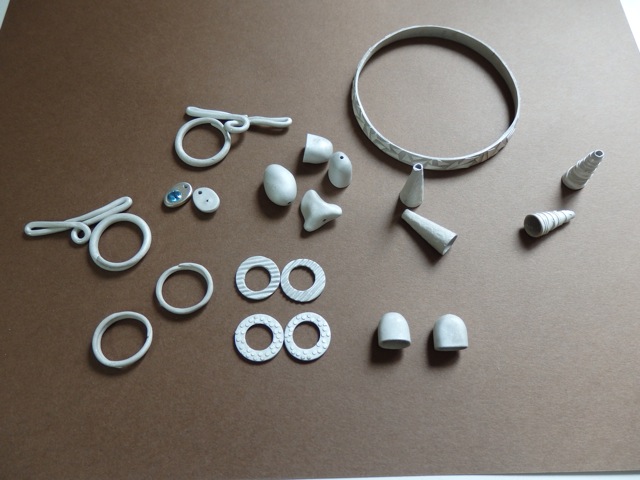
I started by making some simple toggle clasps using rolled “snakes” of clay, some washer shapes to use in multi-strand necklaces, some cone ends, and a bangle. I also wondered about firing synthetic stones in place. (The suggested temperature for using these in fine silver clay is lower than the 1500º needed to fire the enriched sterling clay.) And, I made a few of my usual “rock” beads to see if I noticed any difference in them with the 960 sterling clay. Results after firing:
The stones I tried withstood the temperature, and everything else seemed to have fired well. A few of the pieces have added details made from PMC sheet. There was no problem using that on top of the 960 clay.
I did run into a little trouble with cracking on the bangle and with the seam on one of my “rock” beads.
I have never made a bangle with fine silver clay, so I’m not sure if this was a design flaw on my part. I wanted to test the strength of the 960 clay by making this type of bracelet. I may have over supported it by dropping it into a pile of investment rather than putting it flat on a tile to fire it. (I use investment to support my pieces in the kiln rather than vermiculite.) I think the investment prevented some of the shrinkage as the piece fired, causing cracks and stress spots.
The bead is a different story, and something I learned while trying the 960. When I put two pieces of unfired PMC together, I do not use slip. I use water on each edge and squidge them together. This technique has worked well for me. However, the 960 does not seem quite as able to make enough of its own slip on the surface to work like this when putting two pieces together. I would definitely try using slip instead of water, next time, or I would go over the seams with another smudge of clay and then sand it down when dry. Below, one of the rings for the toggle that did not bond like I had hoped when using water along the seam.
Another indication that the bangle was affected by the investment is that it is slightly wider at the bottom.
I figured I had nothing to lose by trying to reshape this on a mandrel. The bracelet seemed to take the hammering okay. It had the sound of a work-hardened piece of silver. But, when I tried to squeeze it a little bit, to see just how hard it was, it cracked and broke. It became a good test piece at that point, and this is how many stress points there were:
I will have to try this again, firing flat on a tile, to see if it happens again. I really don’t think it’s the fault of the clay. The pieces were all sintered, and I could not snap the smaller pieces. Even the seam of the bracelet did not break, though it was starting to crack.
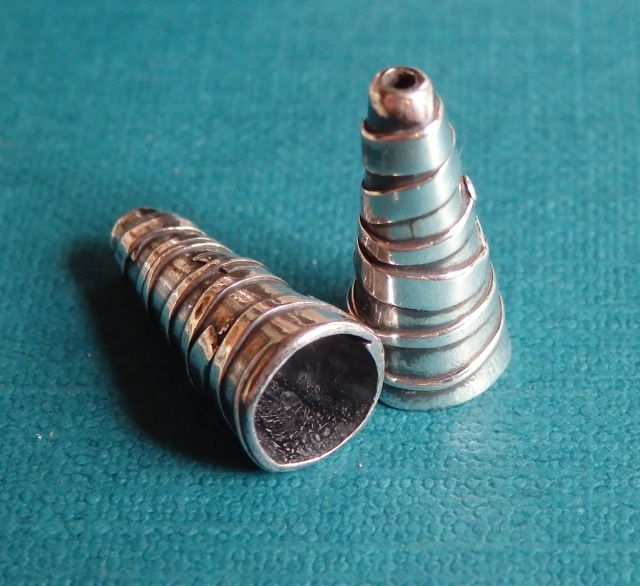
I hammered the heck out of this one piece just to see what it would do to the look of the PMC sheet triangles on the surface. I kind of like the effect.
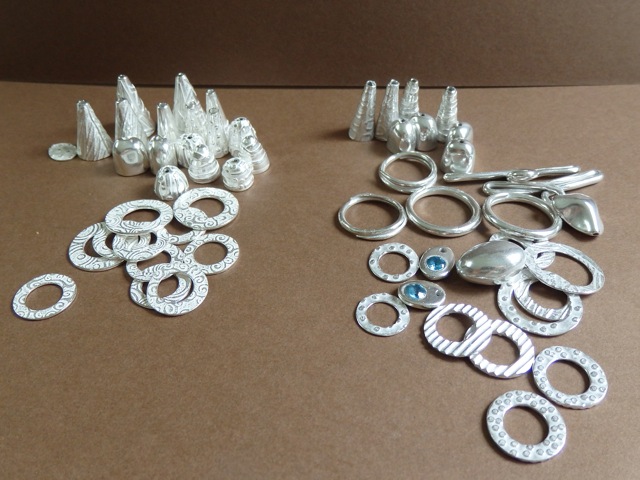
PMC+ (on the left) and 960 PMC (on the right) look a little different when they come out of the kiln. Actually, these pieces have also been in the tumbler and you can still see the difference.
But, after applying liver of sulphur, tumbling and then buffing, I see no difference in their appearance.
All in all it felt like a good first experiment with 960. There are a lot of other things I would like to try with it, including carving before firing. Right now I’m giving the unused portion of the 960 a test to see how it well it stores in a plastic container while I am busy using the components I made in pieces I’m finishing up for galleries this summer. Stay tuned!


Excellent!!
LikeLike
Thanks! I’ve been meaning to write about it, and finally got to it last night. I wonder if we’ll be using any of this this summer at Haystack?
LikeLike
Excellent info here – I have been contemplating getting into metal clay for some time now – appreciate your sharing your testings! BTW: Those cones are just awesome!
LikeLike
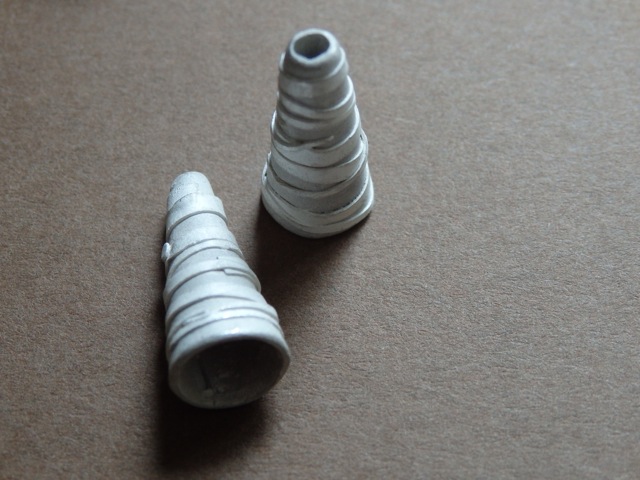
Thanks Patti! I bet you would love metal clay. It’s so nice to be able to make your own beads and components. I’m hoping to make more cones for multi-strand necklaces and earrings.
LikeLike
Barb, I did some tests with 960 too. I found that if you want to bend it, you should fire longer and a little hotter. I fired at 1520 for 1.5 hours. Here’s the link if you want to read my findings. Thanks for this post. We need all the info we can gather. http://pmccblog.blogspot.com/2014/05/a-960-ring-test.html
LikeLike
Thanks for the comment Lora! I will definitely check out your link. I’m glad to know you fired longer and hotter. I’ll try it next time. As for the bangle, I thought it would be easier to just fabricate one. But, I might have to try one more time with your firing schedule. Summer is so crazy busy here that I haven’t made a second foray into the 960 world. I will definitely blog about it when I do. Have a great August!
LikeLike
Pingback: Barbara Fernald Shares Results of Her 960 Test | All Things Metal ClayBarbara Fernald Shares Results of Her 960 Test
Hi, I am new to using .960 metal clay, and with the high firing temps required, I am not finding my gemstones are keeping their color when I fire. Can you recommend a type of stone that would work well with this type of clay, and keep their colors?
LikeLike
Hi Marie,
I have only experimented with the 960 clay once. I did fire some synthetic stones without losing the color. They were ones I’ve had kicking around for so long that I don’t even remember what they were. Something light blue and faceted that I bought at one of the PMC conferences 6 years ago. So, I don’t really feel confident in recommending any particular stone for 960. I wish I had more experience with it to be more helpful to you.
LikeLike