Tag Archives: polymer clay

What draws you back to blogging…

…after almost 9 months away? For me it was reading that Genevieve Williamson, whose blog I follow regularly, was going to spend some time in Maine. “Where?” I asked, in her comment section, hoping that a trip to my little island might be in the cards. I have admired Genevieve’s polymer clay work for years, starting with finding her Etsy site, Jibby and Juna, and then finding and reading her blog.

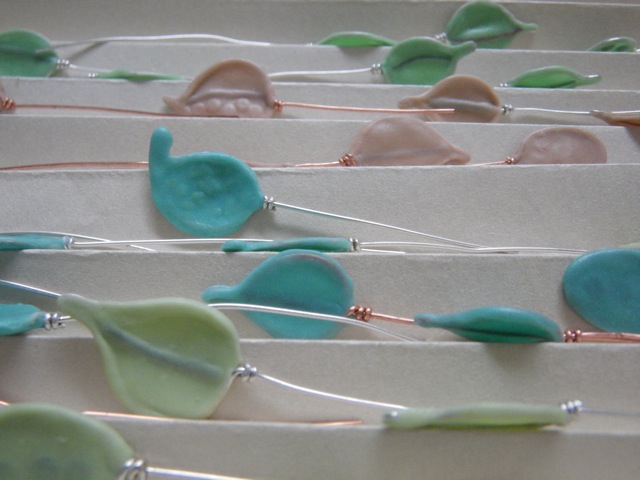
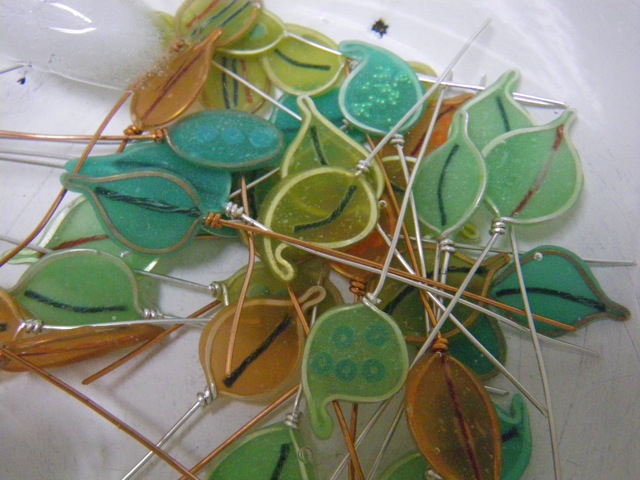
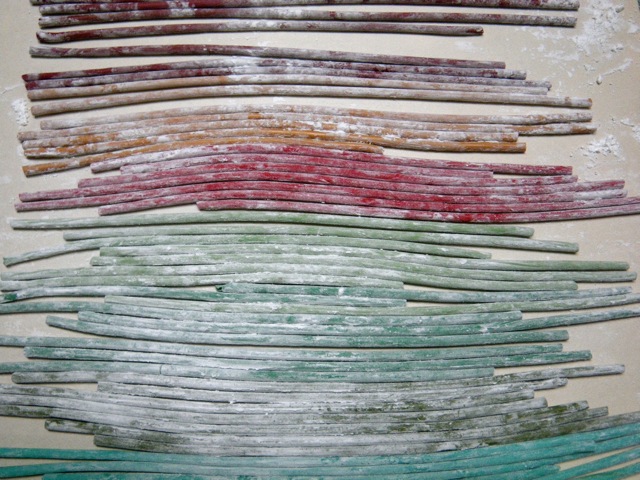
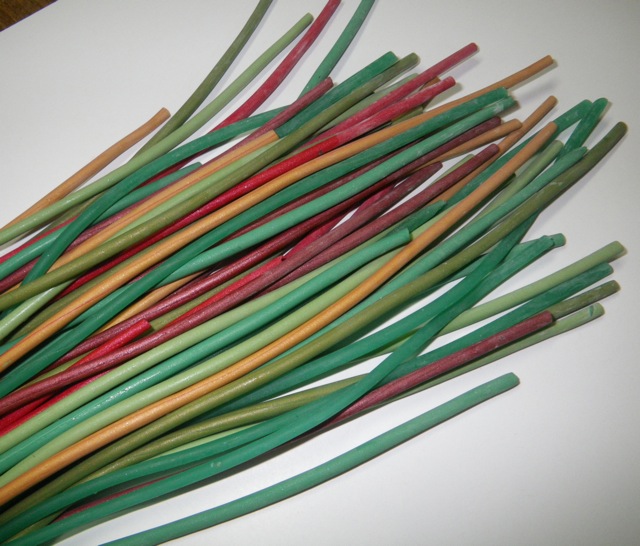
I started working with polymer clay over 20 years ago, learning a lot about making my own canes and beads from a book called “The New Clay” by Nan Roche. Once I got my hands on metal clay, I left most of my polymer work behind, but I never stopped looking at it.  The polymer clay world has progressed and expanded in amazing ways. Check out some of Genevieve’s work from her Etsy shop:

il_570xN.256842623

il_570xN.571028751_ch9a

I love her colors, her carvings, her design….her whole approach to the medium.

When Genevieve responded to my query, it turned out they were planning to stay in Friendship, about a 2 1/2 hour drive away. Her family has a history of visiting Maine islands and they thought it would be a manageable day trip to spend a day on Little Cranberry. Yippee!       For so many reasons.

The first being that I finally cleaned up my studio. I’m always curious about another artist’s studio space, and I wanted to be able to show Genevieve my tiny studio without all of the clutter. (When my creative energy was renewed from her visit, I benefitted myself with an organized spot to get back to work.)  The second reason the visit was a plus is that I got to see my island through new eyes. I live in one of the most beautiful spots in the world, but it is still the place where I do my laundry, pay bills, plan meals, and work. It’s easy to lose sight of so many wonders, until I have a chance to start showing it off to someone who is appreciating it all for the first time.

We fit a lot into a short number of hours. Starting with a prearranged visit to Ashley Bryan to see his studio, his dahlia paintings, and hear how he makes his stained glass window panels from sea glass and paper mache.

IMGP5477(

Ashley spoke of starting his dahlia paintings last October.) He showed his stained glass windows in progress:IMGP2621

And talked about making his puppets.IMGP0322 IMGP0323

(I can’t believe this is the only picture I have of you guys! None of Genevieve, but here is her husband Kyle, and sons Ben and Samuel, before we headed back to the dock for some lunch.)


The very best reason to have Genevieve come to Islesford for a visit, is that we opened the door on a new friendship. It felt like I had known her before, and I know we will keep in touch. As I introduced her to friends at the restaurant or people we met on our walks, they asked, “How did you meet?” We laughed and responded, “We met on the internet!” Thank you for your visit and for inspiring me to get back to blogging. You are welcome to come back any time. I hope we meet up again before too long.

IMGP5611

8 Comments

Filed under Uncategorized

The Inspired Hand VI

I am one of the members of the Maine Crafts Association who has been chosen to have work in this biennial exhibition at the Atrium Gallery on the Lewiston-Auburn campus of the University of Southern Maine.

The exhibition opens this Friday, January 17, with a reception from 6 to 8 p.m. The show runs through March 15. The Atrium Gallery is open Monday through Friday.

IMGP5876

Handmade components and beads: fine silver, copper, polymer clay, sterling silver

IMGP5851

Islesford beach rocks, handmade fine silver hollow beads


Though it is a small island, Islesford is well represented in this show. Including my pieces, there will also be work by Kaitlyn Duggan, Marian Baker, and Sam Shaw. I’m hoping to catch up with a number of my MCA friends at the opening. If you’re in the area, stop by!

6 Comments

Filed under Uncategorized

Clay play

I’m getting ready for my last show of the year in Bar Harbor, Maine on Dec. 6 and 7. For me this means: Get out the clay! No, not ceramic clay, but polymer clay, fine silver clay and the base metal clays of copper and bronze. I make many of my own components for necklaces, earrings, and bracelets so there is a lot to be done before I actually sit down and put these components together. I’ve made a few mistakes and learned some new things in the last two weeks and I’m ready to tell all.  More about the metals in a following post. Today I’m talking about polymer.

My personal discovery of polymer clay goes back to the late ’70’s when I picked up a few packages at the Kimball Shop in Northeast Harbor. I sculpted little lobsterman Christmas tree ornaments for my family and friends and baked them up in my oven. I was only just getting started in making simple earrings with sheet silver and a jeweler’s saw. It never occurred to me to mix the Fimo colors and make my own beads. I put the Fimo away for 10 years or so as I was concentrating on working with silver and mothering two babies.

Fast forward to the early 90’s when I started seeing some incredibly intricate patterns on beads made with Fimo. How in the world did they make such tiny patterns on such tiny beads?  Nan Roche’s book, The New Clay, opened up a whole new world to me and I was off and running making my own beads. They were simple slices of canes, drilled after curing, but they were beads I made, in colors I wanted. And they were a whole lot of fun to make.

IMGP8830 When Precious Metal Clay was introduced in the mid 1990’s I would abandon the polymer clay for many years. Besides, I had a ton of beads already made if I needed them.IMGP8826

Currently,the amazing things people are doing with polymer clay has drawn me back to this medium. I’m looking forward to spending whole days or weeks pushing my own polymer boundaries  this winter. Presently I’m  making components from translucent Pardo clay tinted with alcohol ink.

IMGP2745 I’m usually in such a hurry for instant gratification that I haven’t bothered to record what amounts and colors of inks I’ve used to get the finished leaf color. And, I’m never quite sure how they will come out because the Pardo clay is pretty opaque before it is cured.

IMGP5825 IMGP5827 The clay becomes even more translucent when it is cooled, straight out of the oven, in ice water.IMGP5830Information from Pinterest, blogs and FB have inspired me and led me in new directions. Ginger Davis Allman has a wealth of information, especially about translucent clays, on her blog Blue Bottle Tree. I’ve purchased two of her tutorials to try out this winter.

Last week I took (online) a CraftCast course on polymer clay extrusions by Cynthia Tinapple who is an amazing polymer clay artists and writes the blog Polymer Clay Daily. I already had a great set up for extruding polymer clay with the help of an electric drill thanks to one of her earlier posts last summer. I hadn’t used the drill or the technique since August, but I would soon be trying it again.

My desire to make more of these bracelets for my shows turned into an unplanned extrusion experiment.IMGP4169            I discovered I did not have the stash of these flexible tubes that I thought I did. Where oh where had I bought those colorful  tubes, on Etsy? I looked through my purchase info and found out they had come from Mary Soucy’s Etsy shop, Bead Me A Story. It’s a very cool shop and if you have been trying to find those amazing rubber o-rings for your designs, look no further than here. She has them! But what she did not have anymore were the “flexible bugle beads” I sought. I looked everywhere with the help of Google, but I couldn’t find them. I contacted Mary to ask if she would be willing to tell me where I could find them.

“No they are not available although I was the person who made them. Those were handmade beads made from Polymer Clay. I had to discontinue making them b/c they became too labor intensive and my hands and back couldn’t do it anymore. Sorry but they are all gone.”

I asked if she would be willing to sell me a tutorial on how they were made. She said that she had used some softer matte finish clays that were no longer available, and “Basically they are just made with a clay extruder “Makin” was the brand of extruder I used and then you can buy tips which make the holes in the tubing as you extrude it. I don’t remember what store I used to use but the hole makers are the same brand as the extruder.
That’s about all I can tell you. That, and that it takes very strong hands to extrude clay.”

Before I even looked for the tip I needed, I sent Mary the link to Cynthia’s post on extruding clay with the help of a drill. “Sweet tip!” was her reply. It is a true hand saver.

Thanks to island living and Amazon Prime, I am a very resourceful internet shopper. I had the extruder tip I needed within two days. And with a  bit of a learning curve that involved a few wisps of smoke coming out of my drill (one needs to have very very soft clay to push it through the two-tip combo for making small tubing) I was making my own slightly flexible tubing. I used cornstarch to keep the tubes from sticking together while fitting as many as I could on the tray to go in the oven. This new-to-me process totally worked!

IMGP5835 IMGP5846Now I need to get back to the studio to make some bracelets.


6 Comments

Filed under Uncategorized

Playing with polymer

After checking out the recent blog of my friend Holly Kellogg, and her reference to the polymer clay work of Katrin Neumaier, I decided to get out some of my own translucent Premo clay from last fall. I also ordered some translucent Pardo clay, inspired by Katrin’s incredible pieces. Holly blogged about some of her trials and errors with the Pardo, so I decided to try alcohol inks for tinting the translucent clay. It had been at least a few months since I worked with polymer clay, so I warmed up by fooling around with some simple beads. It took most of the first day just to condition the different clay colors I wanted to use, including some opaque colors.

I tried covering some mother of pearl beads and some copper beads with the mix of clays.

I can’t say I’m too fond of the “Citrus” ink color. It reminds me of pee. (well, post-vitamin pee maybe)

The lighter green also disappeared when layered over a copper bead. I was happy with some of the beads, so all in all it was a good warm up.

I stopped back into my studio, before bed on Monday, to get a feel for what I would try next. I draped some thin translucent clay over a metal form, to give it an unusual shape, and ended up with a sticky mess. But I also ended up with some midnight inspiration. Though it was really late, I started sketching…

Don’t you love it when you can’t wait to wake up in the morning to get going on a new idea? I filled my day in the studio with systematically mixing alcohol inks with two kinds of translucent clay;  Pardo and Premo. I made similar earring components with embedded copper wire and pieces of silver, brass, and opaque clay. I couldn’t wait to see how they differed when fired. They sure handled differently. Premo is much softer and easier to condition. It looks more translucent in its pre-fired state. Pardo is crumbly and annoying to condition and it is more opaque in its unfired state.

For each earring I rolled the clay to a #3 on my pasta machine.

Before firing:

After firing:

(I quenched all the pieces in ice water, just out of the oven. I tried to get them back into their positions on the tray for reference.)

Holy Pardo Batman! There really is a significant difference between the translucence of the two clays.

This is the first time I have used alcohol ink to tint clay. I was pretty relieved to see the Pepto Bismol pink turn into more of a salmon color, and the blue turn into less of a milky purple.

I learned a few more things from this batch that I will blog about later. I’m headed for bed and a day off-island tomorrow.


5 Comments

Filed under Uncategorized

A whole day in the studio!

And no photos to show for it.

Yesterday, I combined different brands and colors of polymer clay together, working with a variety of green colors. I  hoped to get a layering effect with some of the translucent clay.  The colors were darker than I expected after firing. Some of the pieces I expected to be translucent were not.  I used mostly Premo yesterday afternoon, and one of the alcohol inks I used was a citrus green. After I fired those beads, the light green clay looked like pee!  I have forgotten a lot of what I used to know about polymer.

Today, I decided to get a little more organized. I kept the Pardo translucent separate from the Premo translucent. I tinted each one with the same color ink. I made similar earrings to see how the two clays differ. I haven’t fired this batch yet, so I’ll wait to do that tomorrow and take more photos then. One thing I do know, I like the feel of the Premo translucent clay  much better than the Pardo. Pardo was dry and crumbly, and took much longer to condition.

In the meantime, I’ll post some photos of lobster bait at the Cranberry Isles Fishermen’s Co-op.

I know. It’s pretty random.

Redfish racks. Yum.

Some bait gets so old, it can’t even be given away!

And some bait gets left behind, unintentionally.


6 Comments

Filed under Uncategorized

Thousands of beads and a show in 4 days


If you are going to be in Ellsworth, Maine this weekend, stop by at the Ramada Inn (old Holiday Inn) and check out the talented company I’ll be keeping at the Beads Baubles and Fleece Downeast show!

This is going to be a great opportunity to see some friends I haven’t seen in a while, and to see what they’ve been creating lately. It is also a chance to de-stash my own studio a bit as I offer some beads I haven’t used in a while.

Once upon a time, before PMC was invented, I made a lot of my own polymer clay beads. I created colorful canes to slice fire and drill so I would have plenty of 8 to 10mm  beads to use in multi-strand, multi-colored necklaces.


I like all kinds of beads, but I love making my own beads to use in combination with others. For many years these Fimo beads fit the bill. I could make canes and slice them into beads all day long. I made many many necklaces with them. Then, in 1998, Fred Woell introduced me to a product from Mitsubishi Materials known as Precious Metal Clay. I learned to make beads from silver that started out as a moldable metal clay. Once the “clay” was fired, and the binder burned away, I had beads of pure silver. Eventually I said goodbye to the polymer clay, and stored my many handmade beads high on a shelf in my studio.

Once in a while I would get a request for a beaded necklace like the one above, but the beads mostly stayed out of sight and out of mind…until I applied to the Beads Baubles and Fleece show. I thought it would be a good opportunity to see what someone else might do with my beads if they were for sale. I dug out the boxes of Fimo beads and I was shocked at the number I had put away. There must be thousands. (unfortunately, some of them were never drilled so I still have some work to do before selling them.)

These boxes represent hours and hours of work. I have no idea how to price them, but I will come up with a plan before Friday. Bruce suggested selling them by weight, using a scoop. It sounds like a pretty good idea.

I will also have some jewelry for sale at my booth, though I’m running out of time to finish more necklaces. I’ve never sold beads or components before, but it’s an idea I’ve had in the back of my mind for a few months since I like to buy beads and components from other artists on Etsy.  I enjoy making beads so much, I wonder what it would feel like to stop at that point and sell them, rather than work them into necklaces or earrings.

As I get ready to sell beads I’ve made, and an assortment of other beads I bought but haven’t used in a while I’m thinking:

What if I have the prices too high and I can’t sell them? What if I have the prices too low and I piss off other sellers at the show? What if I sell beads I really like and then wish I had kept them? What if I sell everything on the first day? What if I sell nothing in two days? What if my display looks cheesy, tacky, unprofessional?

What do you know? My insecurities about selling beads at a show are the same insecurities I have about selling jewelry at a show. Only this time I’ll have both beads and jewelry for sale. It’s time for me to remember that I’m not the only one who feels this way before a show. Maybe I could just lighten up and decide to have a good time no matter what. But first…I have a few holes to drill….


15 Comments

Filed under Uncategorized

One week ago…

…it was all about the polymer clay. At Celie Fago’s mokume bracelet workshop in Vermont. I should have posted a lot sooner, but I feel like I am still catching up.

Making the billet for the mokume slices involved mixing a few different layers of translucent color.

The billets were made with several layers of translucent polymer, separated by sheets of metal leaf, ending with a layer of pearl white and then black. Then it was time to press tools into the clay, carrying the black from the top layer down through the translucent layers.

Next, the layer of black was removed, with a tissue blade, to expose the translucent mokume layers below. Holly’s colors above made me think of s’mores.

The colors and patterns show up as a surprise, as the thin layers are harvested from the billet with the sharpest of tissue blades. The slices are placed on a  layer of translucent clay, then  fitted to a bracelet core and pressed on carefully to be sure the long seam butts together.

My bracelet, straight out of the oven, will need some serious polishing with various grits of wet/dry sand paper. Then it will be polished with a muslin buff allowing the depth of layers to show through.

This photo does not really show the subtle change of color in the bracelet’s layers. This bracelet is quite a bit larger than something I would usually wear,  but I will definitely try the mokume technique again. It will probably show up on beads or on polymer inlays for other silver pieces, or who knows where?  On the next attempt I’ll use translucent colors that are not quite as closely related.

With any  new technique, I usually find the first piece to be one I would like to bury somewhere. Especially in the case of this piece since a large part of it was burned in the oven (unintentionally.)

This will hang around my studio for a while, as a reminder that I have a new technique to master. I won’t pick it up again until probably after Christmas, but the whole time it sits inactive on my bench, my brain will be taking in ideas to try when life slows down in January.

The class was comprised of 9 students. All but two of us had worked with metal clay before. All of us wanted to know more about polymer clay. We did most of our metal clay work before starting the polymer.Which meant that 7/9ths of the class was in their comfort zone, and were perfectly willing to share and teach what we knew about metal clay when our 2 friends got stuck. We knew that on the following day, with the polymer, we would be out of our comfort zones and need some polymer advice.

Here’s what happens when metal clay people get together for a polymer clay workshop. The metal clay portion of the class explodes with work because we are all so happy to know what we are doing! Previous classes have made many less PMC  pieces. Everyone was prolific in this class. Even the beginners who found their comfort zone pretty darn fast!

7 Comments

Filed under Uncategorized

Heading to Vermont

I’m off in the morning for a 4 day class with Celie Fago in Bethel, Vermont. I’ll meet up with my friend Holly Kellogg to stay at the home of friends Donna and Henry  Isaacs. So much opportunity to be surrounded by art and creativity. I can’t wait! After the busy weeks before and after Robin and Stephanie’s wedding, and after supporting my mom as she recovered in the hospital, I am ready and more than excited to be restoring some depleted creative energy.

The workshop will be making bracelets using polymer clay, and some metal clay. Below are photos of Celie’s work as samples of the techniques we will learn.


It’s supposed to be a drizzly weekend in Vermont. I doubt I’ll even notice the weather.

Below are more earrings from my patina experiments. Copper metal clay headpins with verdigris patina. I’m having a blast exploring alternatives to using silver. These earrings remind me of something from a Dr. Seuss book. I’m not sure if that’s a good thing or not, but I’m looking forward to more work with the base metal clays and how well they accept patinas.

Time to pack!


5 Comments

Filed under Uncategorized