Tag Archives: Precious Metal Clay

I didn’t blog much all winter but I did make a lot of beads.

I love to make beads. I love to use beads made by others. If I had all the time in the world and could set up an area in my studio to do something new it would be to  make lamp-worked (also called flame-worked) beads. I’ve tried it in a workshop and I know that learning to make these beautiful beads would take too much time away from my love of Precious Metal Clay. It would take years to develop the skills I want to have to make glass beads. So, there are a few glass bead makers from whom I buy regularly.

One of them is Susan Kennedy of SueBeads.  Here is the link to her Etsy Shop where I first discovered her fine work. Now I’m more apt to see her latest ideas on her FaceBook page. In the middle of March  Sue  posted some beads I had not seen before. Scarabs. I had to have some! And when the wonderful beads arrived, I knew I wanted to try making some in silver, to use in a necklace along with her beads. I sent her a private message, asking her permission to make a silicone mold of one or two of her scarabs so I could reproduce my own hollow scarab beads in silver from PMC. She was totally supportive and I knew it would inspire a future blog post, as long as my beads came out as I hoped.

Below are photos of my process, followed by some finished pieces.

Sue’s scarabs are embedded halfway in plastocene, ready to have the two part mold material pressed on top.

IMGP2667

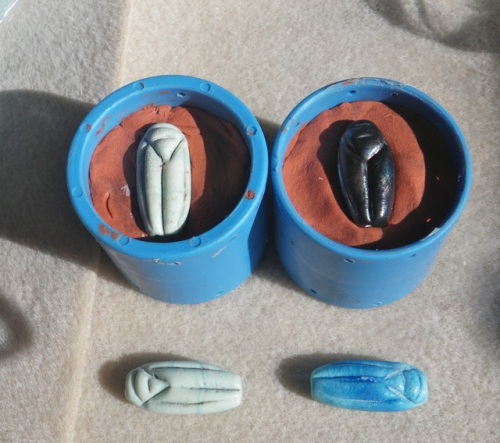
The finished molds with metal clay pressed in to pick up the design. I made two halves from each mold so that my hollow beads would be two-sided.

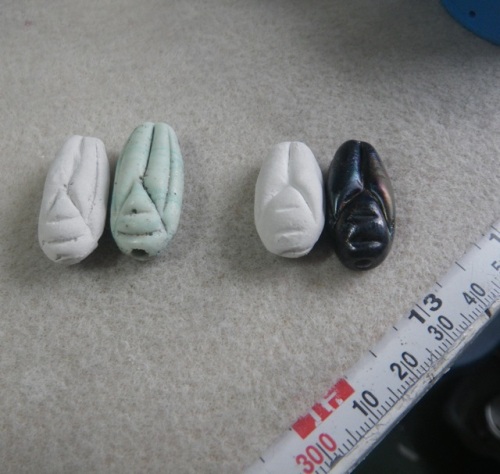
My silver clay beads before firing, next to two of Sue’s beads.

IMGP2680

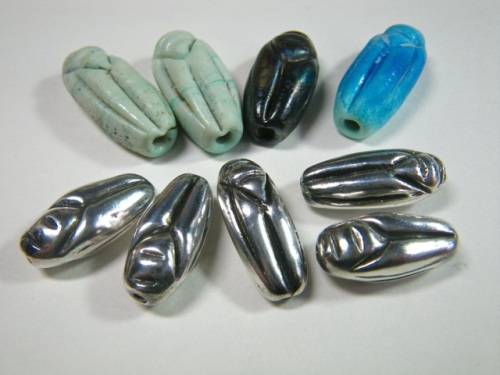
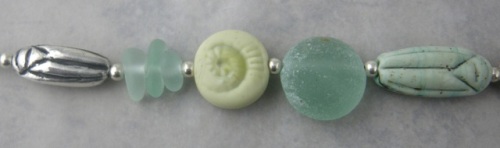
Sue’s glass beads on top, my silver beads on bottom. These guys are now ready to party together!

IMGP2736

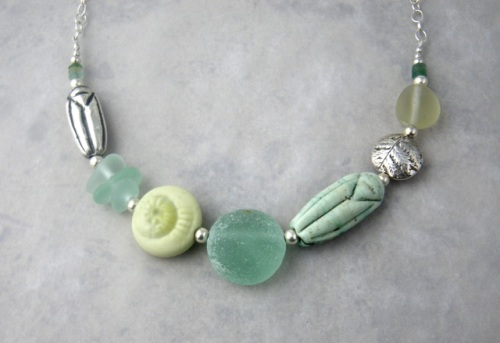
I made four different necklaces using each of Sue’s beads. In three of the necklaces I combined my scarabs with hers.

This is the only necklace without one of my metal scarab beads. Only because I haven’t yet worked on making some in bronze. You can see Sue’s scarab bead setting the tone for the bright colors in the necklace. There are glass beads made by a few other artists as well as the beach rock and sea glass that I drilled, and some African glass beads. The metal beads are ones I made from bronze metal clay.

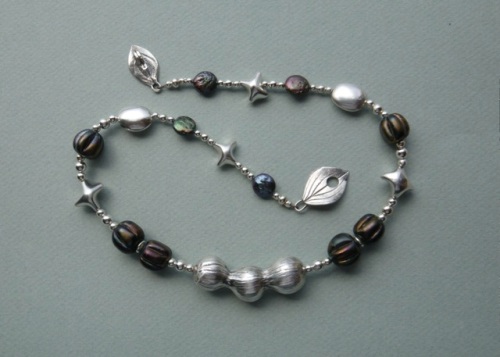
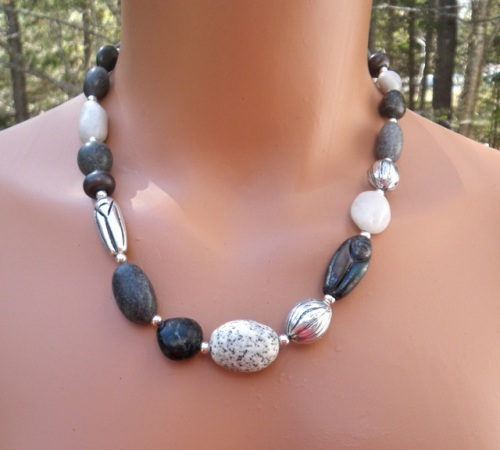
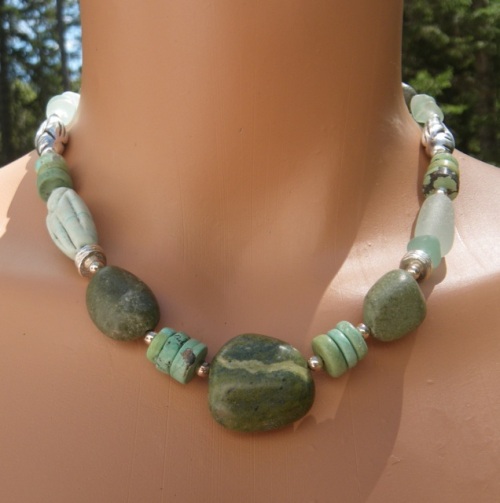
Below is one of my more traditional beach rock necklaces. I love how well Sue’s beads combine with the organic beads I make. Notice the other two pod-like silver beads. They are made with a mold I took from a goldenrod stem gall. (I’m always on the lookout for unusual things to mold. When I made the stem gall mold a few years ago I had to look it up to see what it was called!)

IMGP2773IMGP2774

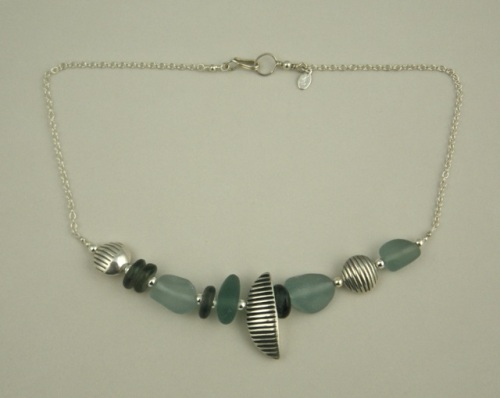
Another rock necklace. I really like how Sue’s scarab on the left balances with the longer piece of sea glass on the right. Two silver scarabs are farther up on the necklace. The rondelle stones are turquoise. The beach rocks come from the island where I live. I drill them myself to use for beads.

IMGP2816IMGP2871

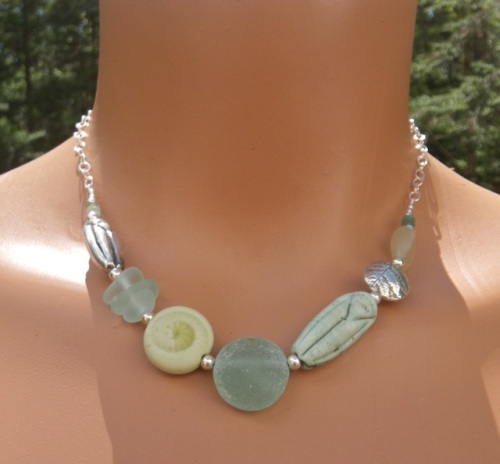
This last one is a lot lighter, and might be my favorite of the bunch. I made all of the scarab necklaces one after another because I was so excited about the beads. In this last necklace, Sue not only made the scarab bead, but also the ammonite bead. The sea glass pieces come from the Northeast coast of England and I also drill them to make  beads.

IMGP2807IMGP2880IMGP2882

Now these necklaces are off to galleries for the start of the summer season. Time to get back to making more beads and seeing if Sue has any more scarabs.

14 Comments

Filed under Uncategorized

The Inspired Hand VI

I am one of the members of the Maine Crafts Association who has been chosen to have work in this biennial exhibition at the Atrium Gallery on the Lewiston-Auburn campus of the University of Southern Maine.

The exhibition opens this Friday, January 17, with a reception from 6 to 8 p.m. The show runs through March 15. The Atrium Gallery is open Monday through Friday.

IMGP5876

Handmade components and beads: fine silver, copper, polymer clay, sterling silver

IMGP5851

Islesford beach rocks, handmade fine silver hollow beads


Though it is a small island, Islesford is well represented in this show. Including my pieces, there will also be work by Kaitlyn Duggan, Marian Baker, and Sam Shaw. I’m hoping to catch up with a number of my MCA friends at the opening. If you’re in the area, stop by!

6 Comments

Filed under Uncategorized

Bound for Dorchester in (less than) one week!

I’ve been invited to participate in a holiday trunk show next Monday in Dorchester, Massachusetts.  A friend (Susan Fenton) of a college friend of mine (Noreen Reilly) said she would be happy to have people get a chance to see (and buy) my jewelry, along with an eclectic offering of items from 18 other people and businesses.

JOIN US FOR AN EVENING OF   WINE, GOOD FRIENDS & A LITTLE BIT OF INDULGENCE

Holiday Trunk Party

MONDAY, DECEMBER 10TH

7:00PM – 9:00PM

THE BOSTON WINERY

26 ERICSSON STREET, DORCHESTER, MA 02122

FEATURING LOCAL VENDORS:

THE BOSTON WINERY

A TO Z FINE ARTS OF WELLESLEY – Peter Ziegelman

ARBONNE – Michelle Lenaghan

ARDYSS INTERNATIONAL – Dalis Santos

BARBARA S. FERNALD JEWELRY – Barbara Fernald      (You are here)

CIGAR FACTORY – Marcia Weaver      

THE GOLD MAN – Tom will buy your unwanted Gold 

FROM THE HEART – Chris Nardone     

HOIST AWAY BAGS – Laura Cleminson    (Yay! Another Mainer!)

KATIEGIRL DESIGNS – Kaitlyn Brohel

KATHLEEN OF BOSTON – Kathy Mahoney

MaRKet – Jennifer Allen

SHEILA DATZ ACCESSORIES – Sheila Datz

MICHELLE’S TREATS – Michelle Foley

STELLA & DOT – Gina Wahlberg

STITCH HOUSE – Annissa George

THIRTY-ONE GIFTS – Nina Rayfield Tate

TOP IT OFF – Elizabeth Hoenscheid

VINTAGE FUSS – Amy Rose

I’ve added links to the web sites I could find to give you an idea of the great group of people I am going to meet. Just click on any of the underlined names.

After some successful sales at the craft fair on Friday and Saturday, I need to head to the studio today to work on some new pieces to boost my inventory.

To my friends in the Boston area I pose a question: Doesn’t this venue sound like a great way to shop? Even if your shopping is finished, you could stop by and say hi and enjoy a glass of wine. (You can even have my glass!)

Fine silver hollow "rocks."

Fine silver saucer bead earrings.

Pod Necklace. Fine silver, glass, freshwater pearls.

Patinated copper with silver.

Sea glass, fine silver, sterling silver chain.

Patina-ted brass, sterling silver.

Sterling silver.

Fine silver, sterling silver posts.

Oh baby! It’s going to be a good time!

2 Comments

Filed under Uncategorized

Pretty light inside too

Not only is November light beautiful at the beach in the afternoon, it looks pretty good inside my studio, too. Just look at the shadows cast by tiny beads on my bench, calling me to sit down, be creative, and enjoy.

And that’s just what I’ve been doing. Enjoying my work. Making that final push before the holidays and feeling more energized by the deadlines than frazzled. I don’t know if I will still feel this way after Thanksgiving, but for now, I’ll take it.

My focus has been on beach rock and sea glass necklaces. Today I sent 8 of them to the Center for Maine Craft in Gardiner, Maine. Just in time too as they have a big promotion going on in the gallery for “Black Friday “and “Small Business Saturday.”

Events: Mark your Calendar!

Hugs

Black Friday: November 23rd 9am-8pm
After a long, early morning of shopping come by the Center and “Grab a Hug & get a discount”!  The Center staff will have a bowl of Hershey Hugs marked with discounts – 5%, 10%, 15%, or 20%.  Grab a Hug and get a discount off your whole purchase. *

 
*Can not be combined with any other discounts or sales.
Small Business Saturday: November 24th

Small Biz Sat

Between Black Friday and Cyber Monday is a day dedicated to supporting small businesses nationwide. Last year,

over one hundred million people came together to Shop Small® in
their communities on Small Business Saturday®.

Come support the Center for Maine Craft and its over 300 current artists with work on display.  Put your name in a RAFFLE for a Center Gift Certificate!  Also, don’t forget a purchase receipt gives you a discount coupon for local businesses in downtown Gardiner!  A double benefit for going small and going local!

If you are traveling up or down interstate 95 or 295 in Maine after Thanksgiving, this stop is right on your way. It’s the only place I know of where you can get gas for your car, pee, get something to eat, and shop for some great craft work made by my fellow Maine artisans. Sounds like a wacky combination, but it’s really a great idea, and it’s a beautiful gallery.

I photographed the work I sent, but after it was in the mail and I checked my photos, I questioned the backgrounds I used in my haste to get to the Post Office before the mail went out at 11 a.m.


This combination of sea glass and beach rocks also includes some of Sue Kennedy‘s beads. I really love the way her etched beads compliment the rough sea glass. (If you want any of Sue’s shiny beads etched, you can just ask her and she’ll be happy to do it for you.) Can you spot them below? There’s a sweet disc with frit (bumps of glass) along the edge on the right side of the photo. (It’s right next to a cream and caramel colored bead that I actually made myself in a class 2 years ago. Yes, I wish I had the time and set up to delve into glass bead making, but it’s not to be right now. Good thing Sue makes such beautiful beads!) The white egg shaped bead with the dots is also one of Sue’s.


I hang on to most of the wacky beads I’ve made myself because I never know when they might come in handy. Like this experiment with translucent polymer clay covering a copper bead. (It’s the center bead.)


I like to use this necklace design with the smaller pebbles and handmade fine silver beads:


That is sterling silver-plated Beadalon cable between the pebbles.


Oy! Time to leave this nasty background color behind. What was I thinking??  Here’s a longer (37″) necklace combining the beach stones, some sterling chain, freshwater pearls, and some flat disc fine silver beads I made.


A more symmetrical piece with beach rocks and fine silver:


My favorite thing to do is to combine the fine silver beads I’ve made, with the beach rocks I drill and the handmade beads of others. Below, two ceramic beads made by Keith O’Connor really work with the granite pebble and the lines in the silver beads: (I buy Keith’s beads at Beadin’ Path in Freeport.)


More examples of sea glass, silver, and Sue beads:


When I have all my beads spread out in a mess on my workbench, I sometimes see combinations that would not have occurred to me. Here are fine silver PMC beads with a copper clay bead that I have patina-ted.


I’m ready to go back to work in the studio after a walk with my sweetie. I have a show on the last day of November and the first of December in Bar Harbor, and another show on December 10 in Boston.  I still hope to get my Etsy shop up and running again…But more about those later. Time to capture the last of the afternoon light.

8 Comments

Filed under Uncategorized

At last. Back to work with PMC.

I feel like I’ve been away from my studio for a long time. Last week I finally started to get back into the swing of things. I have a number of designs in my head, but I wanted some silver components to include in the finished pieces. What a great feeling to get out my precious metal clay, start listening to a new book on CD, and spend a couple days cranking out some of the beads and components I’ll be using this week.

Leaves are a recurring theme for me. I like the simple lines of the bunchberry leaf because it looks great on its own and it combines well with other shapes. So, the first components I made were from the familiar leaves that grow along the side of the road by my house.

Next, some small textured teardrop shapes. (Hmmm, kind of like an inverted leaf!)

I also made several shapes of my hollow silver rock beads, and some flat and domed spacer beads. Here’s the kiln load, before any of the finishing steps. I know, the dish towel looks a little gross.

Why make flat spacer beads with expensive PMC when they could be chopped out with a disc cutter? Because I can make them thicker than the gauge of sheet metal I would be able to cut out with a disc cutter, the holes are easy to drill before firing, and I make the flat spacers out of rehydrated PMC scraps. I can tumble them for a good long time and the edges will sparkle. I use the spacer for accents, so most of what you see are the edges. I’ve never been able to get that reconstituted clay to be as smooth as fresh clay. It doesn’t take a texture as well, and it is more porous. I learned this spacer trick from Fred Woell, and I use it a lot when I have old clay scraps I want to rehydrate.

With this batch of components I also wanted to try something I read about on Vickie Hallmark’s blog.  She has shared a lot of information about fusing Argentium with fine silver and sterling silver metal clay. (Argentium is sterling silver, but instead of sterling as an alloy of fine silver and copper, it is an alloy of fine silver and germanium.) I fuse Argentium wire to make my own closed jump rings and chains, but I have never tried fusing Argentium to any of my fired PMC pieces.

I used to solder the ends of sterling silver wire to the edges of these leaves to have an attached wire for making a wrapped loop of an earring.  It was hard to hold the wire in place while waiting for the solder to flow, and I usually ended up with solder flowing onto the front of a few leaves. That is not where I would ever want to see it. (Oy, I hate to solder!) Then I tried imbedding fine silver wire in a small ball of clay at the back of the leaves so I could fire the wire in place, omitting the need for soldering. This worked okay, but it used more clay than I wanted on such a thin leaf, and the softer fine silver wire did not have the strength I wanted for an earring. Even with work hardening, there was a little weak spot where the wire went into the clay and I couldn’t reach it to harden with a hammer or burnisher.

So today, I coiled a bunch of Argentium wire ends (20 ga), hammered them, and set them on top of the leaves on a fire brick, and fused them with my torch. There was a little trial and error with overheating the wire, but I quickly got the hang of it. It was so much faster than soldering and so much stronger than imbedded fine silver.

Tomorrow, these pieces will all get a little liver of sulfur bath and  some hand polishing. Then they’ll be ready for jewelry action.

Thank you Vickie Hallmark and everyone else who shares information so generously on their blogs! I have learned some of my favorite new techniques and gained so much inspiration from reading the blogs of other artists. I hope I am paying it forward with my own blog.

16 Comments

Filed under Uncategorized

A few of the pieces I dropped off…

…yesterday at Winters Work.


16 Comments

Filed under Uncategorized

First attempts at scratch foam texture plates

In March, my friend Holly sent me this link to Wanaree Tanner’s blog. I love learning about any technique for creating texture in metal clay and this idea from Wanaree is quick, clean, effective and inexpensive. If you are unfamiliar with her work, take some time to explore her site. You will be blown away by what she makes. I certainly am!

Holly told me not to order any scratch foam myself because she had just ordered more than enough for the two of us, from Dick Blick. We had it on our list of things to try during our one day studio get-together in April, but we ran out of time. She gave me a bunch of the scratch foam sheets to take home. I got around to trying them last week, starting with some simple earring designs. Thanks Holly!

I had my usual “I-can’t-draw-for-beans” paralysis when I tried to think of what to do first with the foam. You literally draw on the stuff with a ball point pen. The indentations will come out as raised patterns when you press metal clay into your foam texture sheet.

I plan to make a whole batch of saucer beads in silver, bronze and copper clay. I’ll be applying patina to the copper after it’s fired. The high spots from this kind of texture will show up really well against the patina background.

I was drawing a blank on ideas for the beads when I started with these earring designs. Probably the best thing I could do for myself, to keep moving forward, would be to make a bunch of large circles in my sketch book, and start making doodles within the circles. Eventually I’ll come up with the design I’m looking for.

16 Comments

Filed under Uncategorized

Back to work with metal clay and a shout out to J.Fred

It sure seems like a long time. Maybe it was before Christmas that I last worked with silver PMC.  I don’t even remember the last time I worked with bronze or copper clay.

I got ready by straightening out my tools, putting away other projects, and getting my metal clay bench in tidy shape as I figured out what I might do next. I actually had some specific earrings in mind; a pair I had made years ago and wanted to retry. The original pair were hollow, flat on the back and domed in front with an off center dip in the dome shape. I could not find the original mold I made with a plastic watercolor palette, so I tried again to get the shape.

These were not quite what I wanted, but I was not getting any closer with successive tries, so I worked with what I had.  I wanted to use 40 gauge copper foil to recreate the dome and dip shape. By having a little mold of copper, I can lay the metal clay on it and transfer it directly to my cup warmer. Using a metal form to drape and shape the metal clay is a handy little trick I learned last winter from my metal clay mentor J.Fred Woell.*  The copper foil or wire heats up quickly, so the clay dries quickly and it doesn’t stick to the metal.

Getting the foil shaped properly didn’t work as well as I had hoped, but I’ll keep at it. It may be that for this particular design I just have to wait for the dome shape to air-dry on the plastic water color palette. I have a few other tricks to try before I give up on this idea.

I also made some cone shapes out of the foil to use for shaping and quickly drying cones from PMC. I would like to use them more with multi strand sections of necklaces. I made some a while ago but they were too wide. I used this handy dandy tool I picked up at a conference to get a thin cone shape. Without the foil cones I could shape the clay directly on the plastic form, then wait and wait for it to dry, or dry it a little more quickly with a hair dryer. With three little copper cones, I can make 6 cone beads in the time it would take for one to dry enough to remove from the plastic form.

The results were more predictable this time.

*To my friend and teacher, J.Fred Woell, congratulations on your well-earned recognition from the Society of North American Goldsmiths. When you introduced me to precious metal clay in 1998 it changed my life!

2 Comments

Filed under Uncategorized

Thousands of beads and a show in 4 days


If you are going to be in Ellsworth, Maine this weekend, stop by at the Ramada Inn (old Holiday Inn) and check out the talented company I’ll be keeping at the Beads Baubles and Fleece Downeast show!

This is going to be a great opportunity to see some friends I haven’t seen in a while, and to see what they’ve been creating lately. It is also a chance to de-stash my own studio a bit as I offer some beads I haven’t used in a while.

Once upon a time, before PMC was invented, I made a lot of my own polymer clay beads. I created colorful canes to slice fire and drill so I would have plenty of 8 to 10mm  beads to use in multi-strand, multi-colored necklaces.


I like all kinds of beads, but I love making my own beads to use in combination with others. For many years these Fimo beads fit the bill. I could make canes and slice them into beads all day long. I made many many necklaces with them. Then, in 1998, Fred Woell introduced me to a product from Mitsubishi Materials known as Precious Metal Clay. I learned to make beads from silver that started out as a moldable metal clay. Once the “clay” was fired, and the binder burned away, I had beads of pure silver. Eventually I said goodbye to the polymer clay, and stored my many handmade beads high on a shelf in my studio.

Once in a while I would get a request for a beaded necklace like the one above, but the beads mostly stayed out of sight and out of mind…until I applied to the Beads Baubles and Fleece show. I thought it would be a good opportunity to see what someone else might do with my beads if they were for sale. I dug out the boxes of Fimo beads and I was shocked at the number I had put away. There must be thousands. (unfortunately, some of them were never drilled so I still have some work to do before selling them.)

These boxes represent hours and hours of work. I have no idea how to price them, but I will come up with a plan before Friday. Bruce suggested selling them by weight, using a scoop. It sounds like a pretty good idea.

I will also have some jewelry for sale at my booth, though I’m running out of time to finish more necklaces. I’ve never sold beads or components before, but it’s an idea I’ve had in the back of my mind for a few months since I like to buy beads and components from other artists on Etsy.  I enjoy making beads so much, I wonder what it would feel like to stop at that point and sell them, rather than work them into necklaces or earrings.

As I get ready to sell beads I’ve made, and an assortment of other beads I bought but haven’t used in a while I’m thinking:

What if I have the prices too high and I can’t sell them? What if I have the prices too low and I piss off other sellers at the show? What if I sell beads I really like and then wish I had kept them? What if I sell everything on the first day? What if I sell nothing in two days? What if my display looks cheesy, tacky, unprofessional?

What do you know? My insecurities about selling beads at a show are the same insecurities I have about selling jewelry at a show. Only this time I’ll have both beads and jewelry for sale. It’s time for me to remember that I’m not the only one who feels this way before a show. Maybe I could just lighten up and decide to have a good time no matter what. But first…I have a few holes to drill….


15 Comments

Filed under Uncategorized

One week ago…

…it was all about the polymer clay. At Celie Fago’s mokume bracelet workshop in Vermont. I should have posted a lot sooner, but I feel like I am still catching up.

Making the billet for the mokume slices involved mixing a few different layers of translucent color.

The billets were made with several layers of translucent polymer, separated by sheets of metal leaf, ending with a layer of pearl white and then black. Then it was time to press tools into the clay, carrying the black from the top layer down through the translucent layers.

Next, the layer of black was removed, with a tissue blade, to expose the translucent mokume layers below. Holly’s colors above made me think of s’mores.

The colors and patterns show up as a surprise, as the thin layers are harvested from the billet with the sharpest of tissue blades. The slices are placed on a  layer of translucent clay, then  fitted to a bracelet core and pressed on carefully to be sure the long seam butts together.

My bracelet, straight out of the oven, will need some serious polishing with various grits of wet/dry sand paper. Then it will be polished with a muslin buff allowing the depth of layers to show through.

This photo does not really show the subtle change of color in the bracelet’s layers. This bracelet is quite a bit larger than something I would usually wear,  but I will definitely try the mokume technique again. It will probably show up on beads or on polymer inlays for other silver pieces, or who knows where?  On the next attempt I’ll use translucent colors that are not quite as closely related.

With any  new technique, I usually find the first piece to be one I would like to bury somewhere. Especially in the case of this piece since a large part of it was burned in the oven (unintentionally.)

This will hang around my studio for a while, as a reminder that I have a new technique to master. I won’t pick it up again until probably after Christmas, but the whole time it sits inactive on my bench, my brain will be taking in ideas to try when life slows down in January.

The class was comprised of 9 students. All but two of us had worked with metal clay before. All of us wanted to know more about polymer clay. We did most of our metal clay work before starting the polymer.Which meant that 7/9ths of the class was in their comfort zone, and were perfectly willing to share and teach what we knew about metal clay when our 2 friends got stuck. We knew that on the following day, with the polymer, we would be out of our comfort zones and need some polymer advice.

Here’s what happens when metal clay people get together for a polymer clay workshop. The metal clay portion of the class explodes with work because we are all so happy to know what we are doing! Previous classes have made many less PMC  pieces. Everyone was prolific in this class. Even the beginners who found their comfort zone pretty darn fast!

7 Comments

Filed under Uncategorized